Table of contents
Sign and send unlimited e-signatures with Xodo Sign.
Sending a contract often turns into a slow process. Delays stack up, especially when several people need to sign or when the agreement needs a clear record of every action.
Xodo Sign removes these steps by giving you a simple way to create documents, add fields, and send it out for others to sign in minutes.
You get secure eSignatures with audit trails, reminders, access controls, and tools that help you keep your signing process moving.
This guide walks you through how to create and send a PDF document that can be signed with Xodo Sign.
How to create and send a document to be signed
1. Create an account or log in
- Start a free trial. You'll be able to access all features. No credit card is required.
- Or log in if you already have an account.
2. Create a new document
- In your dashboard, click on New Document.
- Upload your file.
- Click on Choose Files to upload from your desktop
- Or, drag and drop your file into the uploading area.
- You can also upload files from Google Drive, Dropbox, Box, or One Drive.

Once uploaded, your PDF file will appear in the document view. You can upload PDF documents, Word documents, PowerPoint files, images, and more.
3. Add signers and set up your document
- Choose who needs to sign a document: Me only, Me and Others, or Others Only.
- Enter the names and emails of the other signers.
- Assign Signer or CC roles.
- Add identity verification for added security.
- Set a signing order if required.
- Add a custom message with directions if needed.
- Click on Prepare.

4. Prepare your electronic document
- The right hand side panel will show the available fields and signers.
- Fields you can add include: Signature, initials, dates, text fields, checkboxes and dropdowns
- Click on a signer's name to assign field to that person.
- Drag each field onto the page.
If you want to quickly request signatures without placing any fields, click on Quick Send. Xodo Sign will attach a secure signature page for others to e-sign.
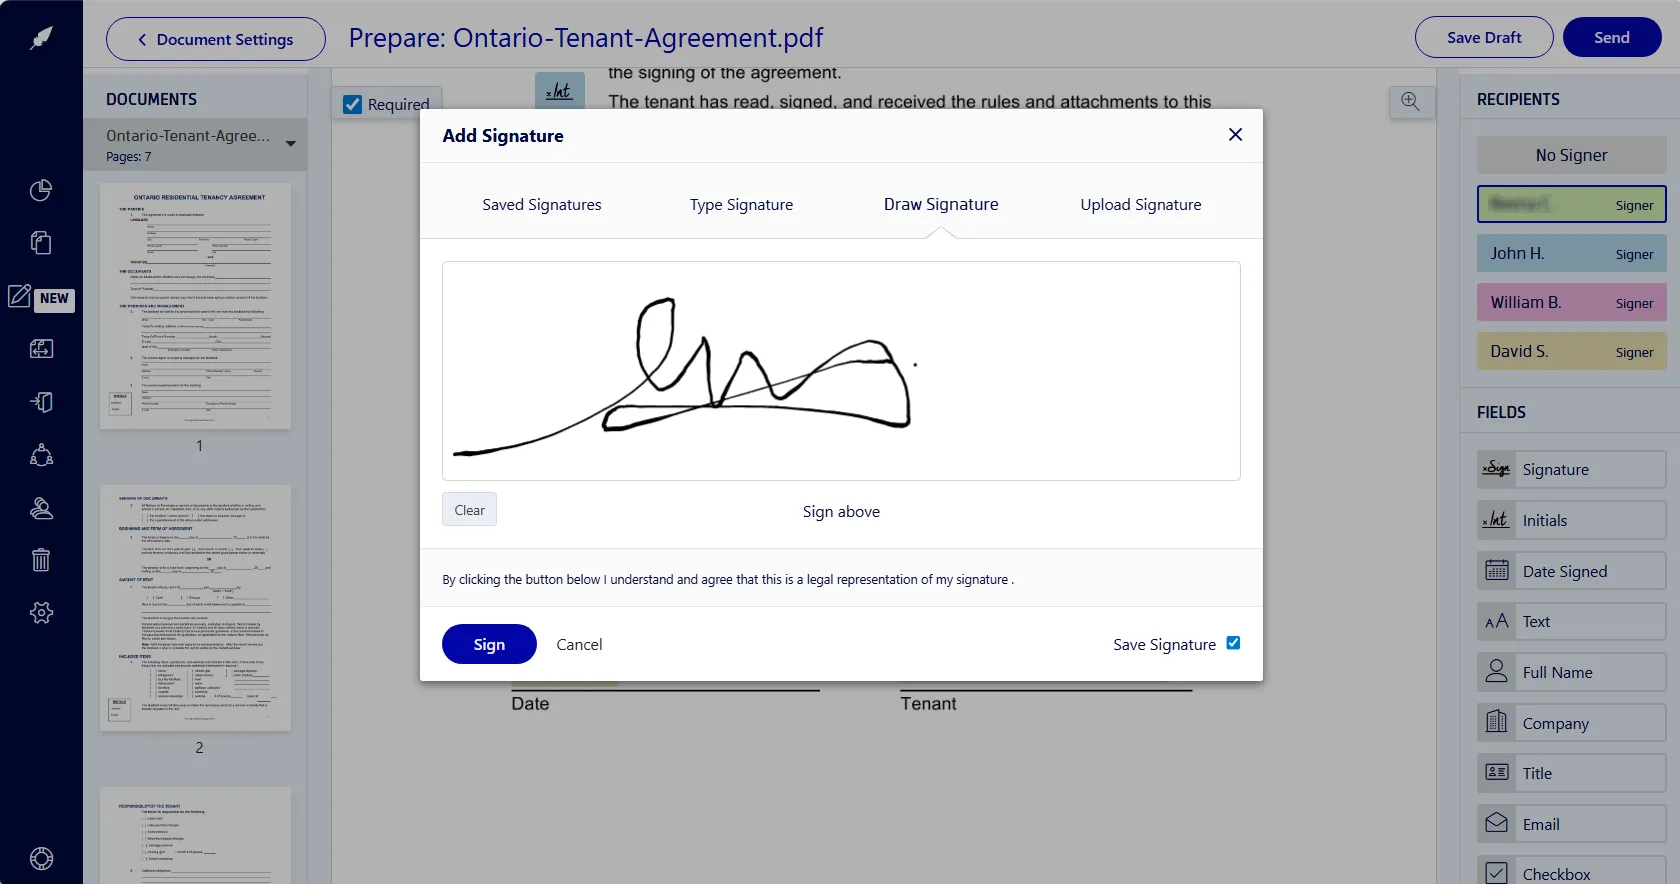
5. Add your signature
- Assign yourself a signature field on a signature line.
- Click on your signature field.
- Draw, type, or upload an image of your signature.
- Click on Sign.
6. Send the document to multiple signers
- Click on Send.
- The PDF file will appear in your dashboard.
- Track to see who has signed and send signing reminders.
- Download a completed and signed copy.
Xodo Sign gives you the tools for managing PDF documents that require multiple people to sign online, retain a copy for your electronic records, and the ability to keep
Why use Xodo Sign for electronic signatures
Xodo Sign gives you a simple way to sign documents online and request e-signatures for secure signing. Its features are ideal for signing Word documents, contracts, real estate agreements, disclosures, and online document across industries. Advanced features include:
- Legally binding e-Signatures
- Audit trails for every action
- Signer authentication with PIN options
- Document editing tools
- AI summarization for your documents
- Templates for repeat documents
- Secure storage
- API support for automated workflows
Xodo Sign can save time on last minute revisions with just a few clicks before you sign agreements. Save the manual work on any collaboration or review process.
Best practices for creating fillable PDF documents online
To ensure the most efficient signing process possible, apply some of these best practice tips with Xodo Sign:
- Use PIN and SMS authentication to secure and ensure authorized access.
- Ensure all parties have access to a copy of the signed document.
- Set fields for signatures, initials, dates, and full names as required so no details are missing.
- Define a signing order to ensure that recipients sign in a specific sequence.
Real estate teams, businesses, law firms, financial services, and construction groups can skip handwritten signatures, accelerate sales, and start signing documents online with ease and without needing to install software.
Frequently asked questions
Are electronic signatures legally binding?
Yes. Xodo Sign supports legally binding signatures in many regions. Each signed file includes an audit trail that records signer details and timestamps, which are compliant with UETA (Uniform Electronic Transactions Act) and ESIGN laws.
What formats can I upload to Xodo Sign?
You can upload PDF documents, Microsoft Word files, Excel, image files (JPEG format, PNG), and many common digital document formats are supported.
How many documents can I send with Xodo Sign?
Plans vary by usage. View all our pricing plan options.
How do I send a document that needs to be signed?
You can send a document for signature by uploading your file to Xodo Sign, adding the people who need to sign, and placing the fields they need to fill out. Once the fields are set, send the document and track each step from your dashboard.
Can I edit a document before sending it?
Yes. With Xodo Sign, you can add text, highlight sections, insert shapes, or redact information before you prepare and send it out to your document signers.
Can I set a signing order?
Yes. You can create a structured signing sequence so recipients receive the document in a specific order. Recipients can sign from any device (including a touchscreen device) without installing anything.
Can I send reminders to signers?
Yes. You can schedule automatic reminders or send a reminder manually from the document status page requesting your contacts to e-sign the PDF.
Is there an API for automated document sending?
Yes. Developers can use the Xodo Sign API to automate sending and collecting signatures.
Try Xodo Sign today
Using Xodo Sign makes it easy to e-sign PDFs and move contracts forward without relying on paper or manual steps. You can upload a file, place fields, and send it out for signature in minutes.
Clear tracking, reminders, and secure storage can keep your signing process organized from start to finish.
If you want a faster way to manage agreements, try Xodo Sign and send your first document today.