

Table of contents
Sign and send unlimited e-signatures with Xodo Sign.
Electronic signatures are now standard. They can be requested on contracts, HR forms, proposals, and internal approvals. While MS Word includes basic signing options, most businesses need stronger security.
As an e-signature platform, Xodo Sign gives you that level of control. It lets you electronically sign or prep and send your Microsoft Word documents for signatures in one place.
We'll walk you through the entire process of signing a Word document using nothing but Xodo Sign.
How to electronically sign a Word document
1. Create an account with Xodo Sign
- Start a Xodo Sign free trial.
The trial lasts for 7 days and lets you use all of Xodo Sign's features, no credit card required.
2. Upload your Word file to Xodo Sign
- From the dashboard, click on New Document.
- Upload your Word document.
- Or drag and drop the file onto the uploading area.
- You can also upload it from Dropbox, OneDrive, and Google Drive.

Xodo Sign supports multiple formats including DOCX. When uploading your document, Xodo Sign will convert it to an editable PDF automatically.
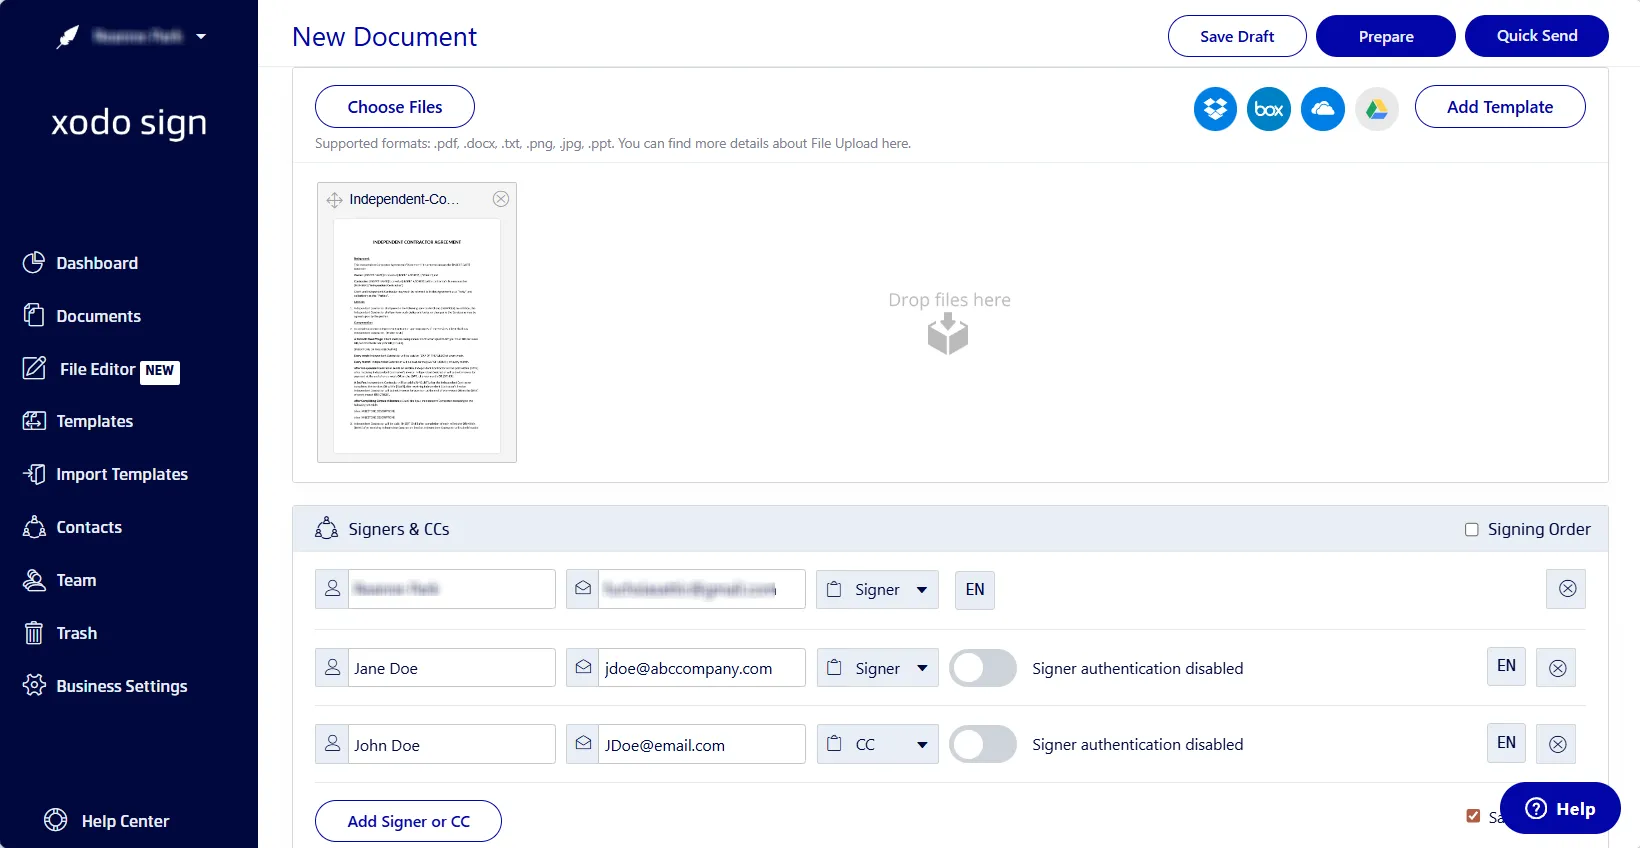
3. Prepare your document for signing
- Select who will be signing.
- If you'll be signing, choose either Me Only or Me and Others.
- If others will be signing as well, add their names and emails.
- Specify a role for each person: Signer or CC.
- Set a signing order if needed.
- Turn on either SMS or PIN code verification.
- Add a message for instructions.
- Set expiration dates, auto-reminders and completion requirements.
- Click on Prepare.
4. Create or insert your signature
- Click on your name in the right-hand panel.
- Drag and drop any required form fields onto the page.
- Add signature, date, text, initial fields as required.
- Click on the field to sign it.
- Draw, type, or upload an image of your signature.
- Click on Sign.
- Repeat the above steps for any other signers.
- Click on Send to collect signatures from the other signers.
- Or, click on Save Draft if you're the only one signing.

5. Track, download and save your document
- Go to the Documents tab in your dashboard.
- Locate the file and track the signing progress.
- Send signing reminders to others, if needed.
- Download a signed copy by going to Actions > Download PDF.
- Save the file securely in your Xodo Sign dashboard
Xodo Sign adds these capabilities so you can send, sign, and track PDF documents without extra steps or manual follow-up.
How to sign a Word Document with Microsoft Word
To sign a Word document in Microsoft Word, follow the below methods for simple internal approvals:
- Insert a handwritten signature image by scanning it in as a PNG image file and inserting it as a picture.
- Draw a signature with Microsoft Word’s drawing tools which will let you use your mouse or trackpad.
- Insert a Microsoft Office signature line that will let you add signer details and insert your signature.
While these are quick solutions, there are a few downsides:
- It can happen that the signature line appears greyed out due to Word Online restrictions, unsupported formats, or Microsoft Office license limits.
- Opening a signed .docx in another app like Google Docs or LibreOffice can break the signature field or change its placement.
- If you sign Word documents with different versions of Word, digital certificates may be handled differently, creating inconsistent results.
- Digital signatures require signing certifications that may be difficult to acquire individually.
- Basic electronic signatures added in Word have no audit trail and don't have the same legal weight as signatures from a dedicated e-signing app.
For any document related to electronic contracts, compliance, HR, legal, or finance, you should use the PDF format or a tool with more advanced capabilities.
Why use Xodo Sign instead Microsoft Word to sign a Word document
As an e-signing platform Xodo Sign gives your team the security and compliance you need as well as flexible options to handle a signed document. It streamlines every stage of the signing process. It offers:
- PDF editing tools for quick content revisions.
- Redaction that permanently removes sensitive information.
- Legal compliance with ESIGN and UETA laws
- Audit trails that provide a clear document activity history.
- App integration that connects with external cloud storage.
- AI for summarizing contracts faster.
- Templates for speeding up repetitive forms.
Xodo Sign removes extra clicks, reduces manual work, saves time, and helps users move documents from draft to completion. You get a smoother signing experience for everyone involved either online or on mobile devices.
Frequently asked questions
Is it safe to sign a Word document online?
Yes. With Xodo Sign, you get secure document encryption, access controls, and tamper-proof audit trails to protect your documents and signatures.
Can I sign a Word document without downloading anything or creating an account?
Yes. If you prefer to skip software downloads while still completing a legally binding signature, you can upload the file to Xodo Sign and sign it through a browser.
How do I sign a Word document someone sent me if I don't have their software?
You can upload the Word file to Xodo Sign and complete the signature in your browser. This avoids compatibility issues and lets you sign Word documents without installing Word or any other program.
Is it better to sign a Word document or convert to PDF first?
Signing directly in Word is fine for simple approvals. For agreements, contracts, onboarding files, or anything that needs proof of signing, it is better to use a PDF with a verifiable audit trail. Xodo Sign converts the Word file automatically to PDF and handles the signature with full tracking.
Can I edit and sign a Word document?
Yes. You can edit a Word file by uploading it into Xodo Sign's PDF Editor. Once your edits are finished, you can prepare the document for signing and add a secure, legally binding signature field.
Can I redact information before sending a Word document for signature?
Yes. Upload the file to Xodo, convert it to PDF, and use Xodo Sign's redaction tool to remove sensitive content before sending it for signature.
Can someone edit a Word document after I've signed it?
Yes. A signature added inside MS Word does not prevent edits. Any modifications made after you've signed it can invalidate the signature. If you need a document that is secured after signing, use Xodo Sign. It creates a PDF with a complete audit trail and clear tamper detection.
Can multiple people sign a Word document electronically?
Yes. Add all required signers in Xodo Sign and place multiple signature fields for each person. Each recipient can sign in order depending on your settings.
How do I track who has signed the document?
Xodo Sign shows the signer progress, activity logs, and status for each recipient. You can send auto-reminders to different signers who have yet to insert a signature.
Is a Word-based signature legally enforceable?
A signature image in Microsoft Word is not legally binding on its own. A compliant eSignature platform like Xodo Sign provides identity verification, a timestamped audit trail, and proof of signature that make electronic signatures legal.
Final Thoughts
When you sign Word documents online, the process should be simple, fast, and secure.
Xodo Sign adds the compliance, tracking, automation, and protection that most personal and business workflows need today for all types of formats.
Streamline and manage your document signing process with confidence. Start with Xodo Sign.


.webp)