Table of contents
Sign and send unlimited e-signatures with Xodo Sign.
Sending one document for a signature is easy. Sending fifty is where things fall apart. Sending each file individually wastes time, increases errors, and makes tracking a mess.
This is where bulk send e‑signatures come in. It isn't about sending multiple different files in one email. It's about scale. One document. Many recipients. Clean tracking.
Xodo Sign lets you upload one document and send it to multiple recipients in a single action. Each signer receives their own copy to sign with individual tracking, timestamps, and audit trails.
In this guide, we'll show you how to bulk send e‑signatures, when it makes sense, how it differs from single sends, and how to avoid common mistakes.
How to bulk send e‑signatures with Xodo Sign
1. Sign up for Xodo Sign
- Sign up for a free trial with Xodo Sign.
Note that bulk sending is only available on the Professional and Enterprise plans. A free trial will allow you to try all Xodo Sign Professional features for 7 days and bulk send documents.
2. Create your template
If you already have a template ready, you can skip to step 4 below. If you don't, follow these steps:
- Go to your Dashboard and select Create a Template.
- Click on Choose Files and upload your document.
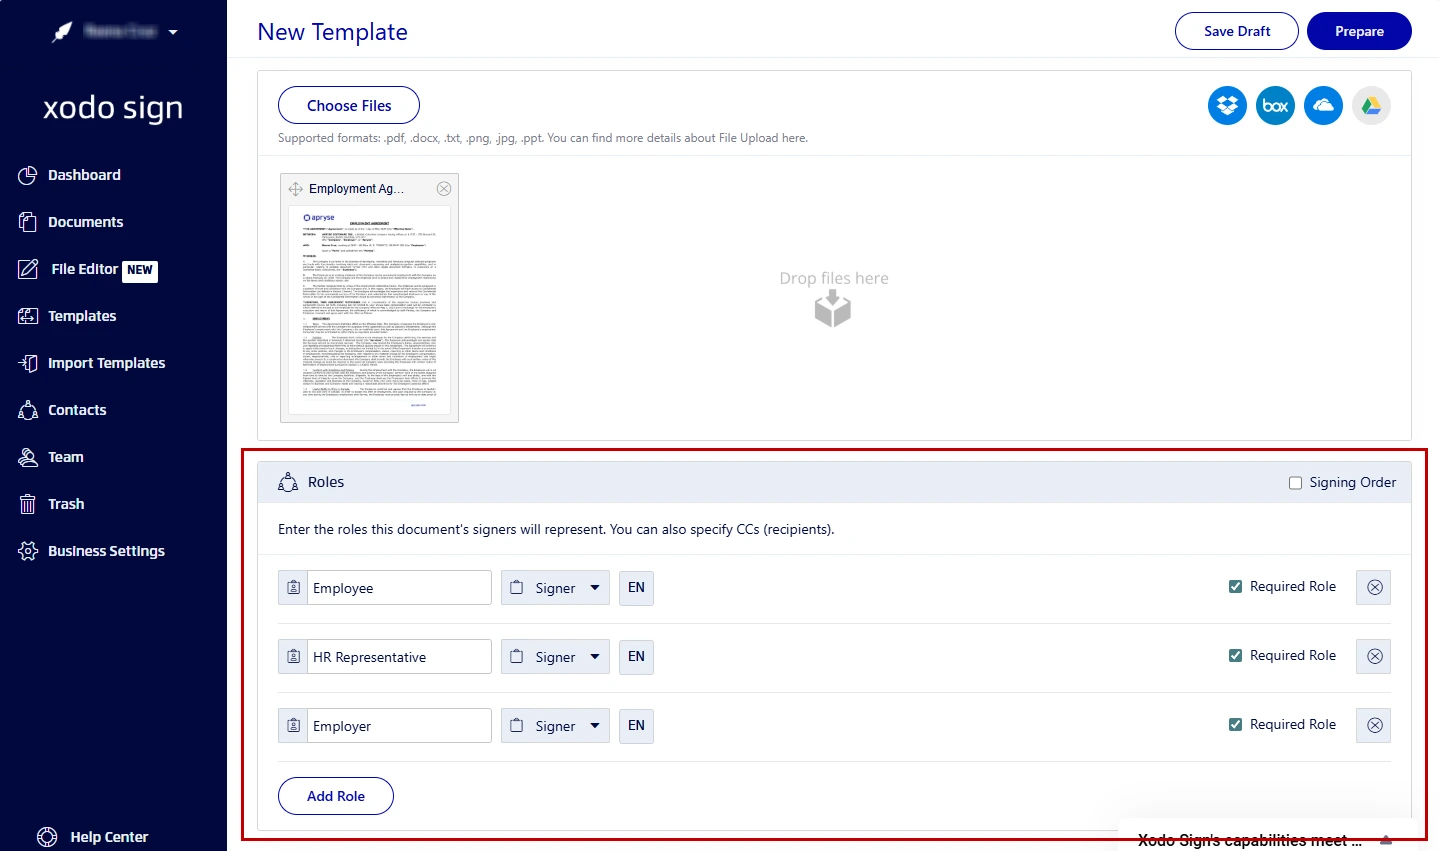
- Set up titles and signing roles.
- Assign Signing and CC roles.
- Specify any template settings and expiration date.
- Add a message with directions.
- Click on Prepare.
Tip: Start with a finalized PDF. Bulk send works best when the document layout will not change. You can also easily import templates from Docusign.
3. Add your signing fields to your template
- Click on a signing role in the right hand side.
- Drag and drop the signing fields onto the document.
- Once all fields are set, click on Save.
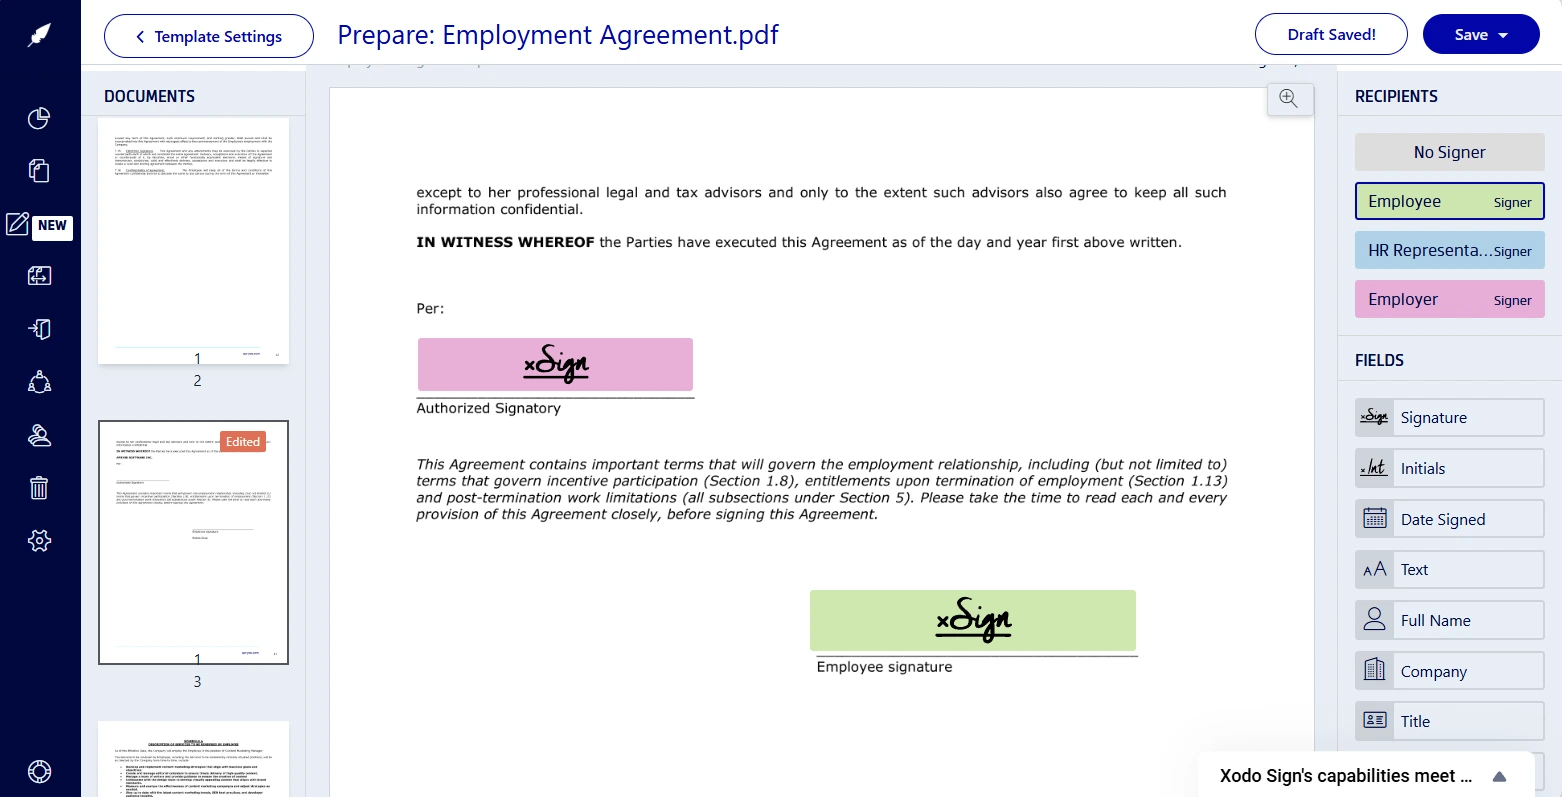
Anything added to the document during this step will appear on every recipient’s copy.
4. Bulk send your template
- Go to Templates in the left navigation panel.
- Locate the template you created and click on Use Template from the dropdown menu.
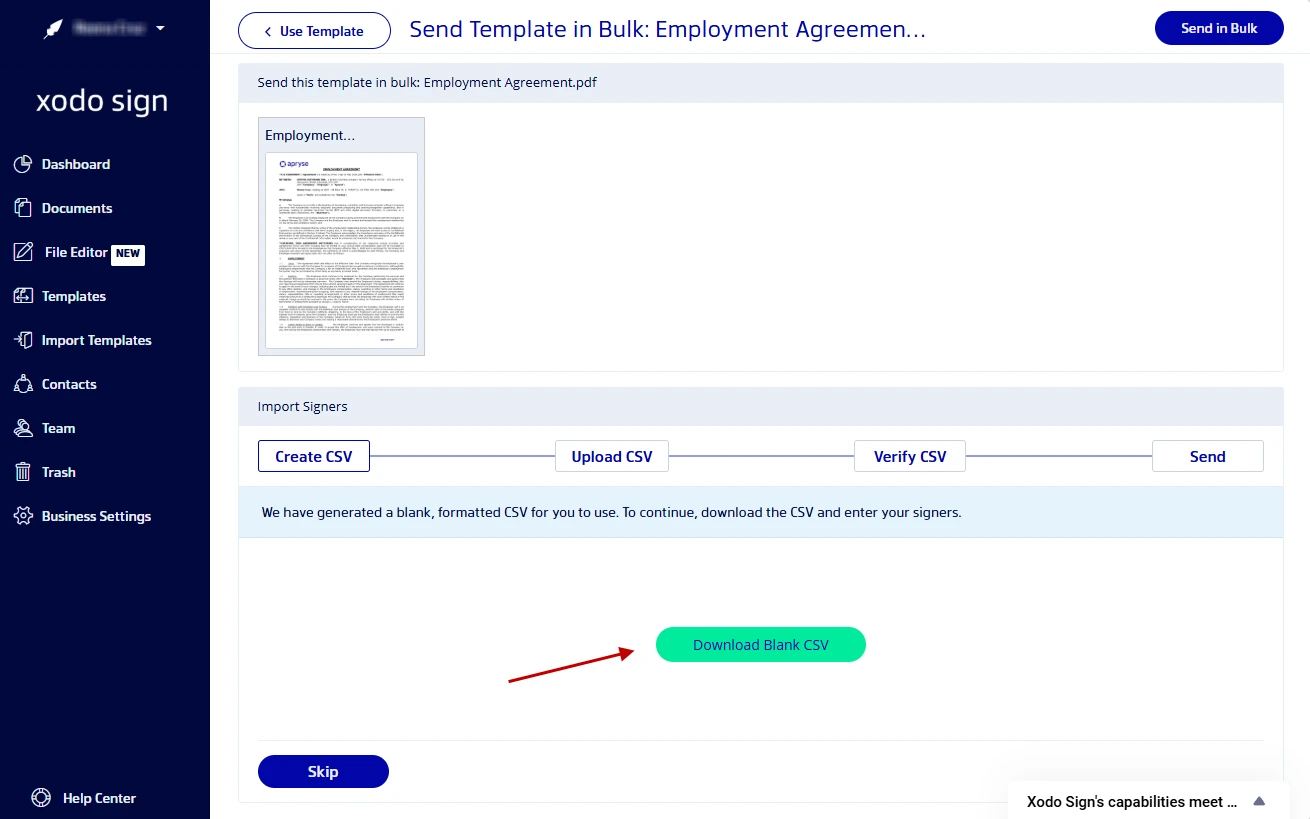
- Go to the Actions dropdown menu > Send Template in Bulk.
- Download the CSV template (or skip this and the next step if you already have your own).
- Fill in the CSV with signer names and emails, then save the file.
- Upload your completed CSV file by clicking Choose Files.
- Review the summary and click Send to X Signers to confirm.
Each row in the CSV file represents one signer and each person gets their own document. All documents will be sent and a Bulk Job is created so you can track their progress.
5. Track progress
To monitor the progress of your documents:
- Go to Templates > Bulk Job.
- Select a bulk job from the list.
- Click on the View button.
- Check the status of the document of each signer.
- View bulk job statistics at a glance.
You can find more details in our guide for checking bulk jobs.
How Xodo Sign's features handle bulk sending at scale
Xodo Sign is built for high‑volume workflows. You can:
- Send 250 documents per bulk request.
- Send multiple signing requests at the same time.
- Generate documents each with their own status and completed copy.
- Track the progress in an audit trail for each document.
- Store and access each completed document separately.
- Download individual signed copies or export them in batches.
The above features can be helpful, or unnecessary, depending on your use case.
Use bulk send when:
- The document content is identical for all intended recipients.
- Each user should act independently.
- When you have a large group of multiple signers.
- You need individual tracking receipts for each signer.
- Volume matters and you don't need to customize anything.
Use single send when:
- Your document requires custom fields or clauses.
- Signers must sign in a specific order.
- The document is part of a review workflow.
- You need the ability of working one‑to‑one.
- The document needs to be secured and controlled confidential.
Looking to send a single document? Check out our guide on sending a document for e-signatures free.
Common use cases for bulk sending
Bulk send shines in high‑volume workflows. These are just a few scenarios:
- HR policies sent to all employees
- Offer letters sent to candidates
- Real estate disclosures sent to buyers or tenants
- Finance approvals sent to vendors
- Operations forms sent to partners
When combined with clear audit trails and legally binding e-signatures, bulk signing saves time and gives teams confidence that every document is completed properly.
Best practices for bulk sending documents at scale
Bulk signature requests work best when you treat it like a repeatable process, not a one‑off task. These best practices help you manage your bulk jobs and move faster without creating cleanup work later.
- Standardize your templates
Create one clean template per use case. Resist the urge to tweak it for edge cases. - Name documents clearly
Use naming conventions that include the document type and date. It helps when exporting signed file. - Limit fields to what is required
Extra fields increase friction. If a field is not required, remove it. - Test with a small batch first
Send a small batch to yourself or a small group, for example, before sending to hundreds. Fix issues with multiple files early. - Monitor but do not micromanage
Bulk send reduces manual follow‑ups. Let reminders handle the rest.
Get these basics right, and bulk sending becomes convenient. You can set it up once and rely it on every time.
Common mistakes to avoid
Bulk send is simple, but a few common missteps can slow everything down fast. Avoid these common bulk send mistakes.
- Trying to personalize content inside bulk sends
Bulk send is not built for per‑recipient document edits. Use single send if customization matters. - Uploading the wrong recipient list
Always double‑check your CSV file. One typo can mean dozens of bounced emails. - Forgetting required fields
If a required field is missing, then every recipient gets stuck. Review carefully before sending. - Expecting sequential signing
Bulk send is parallel. Everyone receives the document at the same time.
A quick review before you send forms can save your organization hours of follow‑up later.
Frequently asked questions
1. Can I send multiple documents at once using bulk send?
Bulk send is designed for one document sent to multiple recipients. If you need to send different documents, you can combine multiple documents into one when creating your template.
2. Does each signer get their own copy?
Yes. Every recipient receives an individual document with a unique audit trail.
3. Can recipients see each other?
No. Bulk send creates private signing requests for each recipient.
4. Can I track who has signed?
Yes. Xodo Sign shows who has signed their document with updated status and statistics for each bulk job and signing document in your dashboard.
5. Is bulk send suitable for HR onboarding?
Yes. Bulk send is ideal for HR onoarding. It lets you send out policies, employee acknowledgments, and standardized agreements when hiring waves of employees, seasonal workers, or new teams.
6. What file format can I bulk send?
For bulk sending with Xodo Sign, it's recommended to only use PDFs due to layout stability.
7. Can I resend reminders?
Yes. You can send reminders to pending signers without affecting the already completed documents.
Scale your signing without adding work
Bulk sending e‑signatures remove the manual steps that slow business processes down. Xodo Sign makes the process simple, transparent, and easy to track, without burying teams in features they don't need.
If your workflows involve sharing the same document again and again, it's time to stop sending files one by one.
Try Xodo Sign and see how bulk sending works in practice.